As continued from Part 1.
4.4. Configure SSL Certificates for OWA HTTPS
We are using Active Directory Certificate Service to issue web Server Certificates for our OWA Farm which will only be trusted and validated within the domain Network. For External Networks such as the internet, you need to purchase a genuine SSL Certificate from a Third party vendor such as Verisign.
If you use Internal Certificates (Such as the one used in this scenario) your OWA WOPI URL will not be valid for external access and it will prompt the security message with critical warning of content. So for production environments, always use a valid certificate.
Setting UP SSL
Open up Active Directory Certificate Services from your AD. At this point, our NORTHWIND AD will be the ultimate Certification Authority.
If you do not have this feature in your AD. You can get it installed via server manager roles and feature installation wizard.

This server already has it installed so it’s just to go ahead. Expand the server and hit Manage.

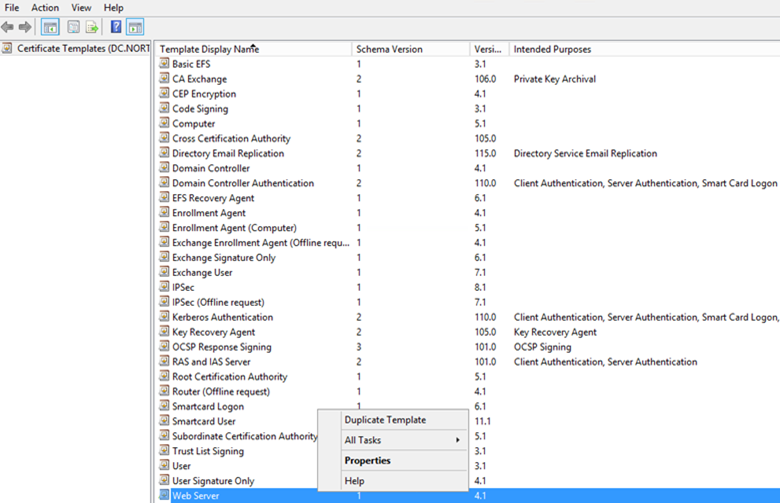
Now the Certificate Templates Console will be opened for you in Edit mode. Right click on the Web Server Template and direct to Properties.
Add the Computer Accounts (OWA1.Northwind.Int |OWA2.Northwind.Int) of your OWA Servers and the Service Account which will be using to setup OWA Farm for following permissions. This will enable the Web Server Certificate Template to enroll from these two servers.
Change Object Types to following types.


Allow all three objects for read and enroll permissions.

That’s all from the Active Directory Side. Let’s move back to the OWA Servers and Open upMMC.EXE to Obtain Certificates.

From the Console Root, Add/Remove Snap-In.

Select Certificates.


Expand the certificates root and drill down to personal. Right click on personal and request a New Certificate.

New Certificate Enrollment Wizard will be prompted for you. Just Hit next to proceed.

Active Directory Enrollment Policy will be selected by default here so nothing much to do. Hit Next here.

You will then see the Web Server Policy is highlighted with the exclamation mark. Click on the message.

That will bring you to the Certificate Properties where you will be providing all the details of this certificates. Select the subject name, type as “Common Name” and alternative name type as “DNS”. Value for both of these field can be the same which is our OWA Farm Name. Basically this Certificate will be dedicated to the OWA Farm. It won’t validate any other purposes. Yet this may depend on your scenario and Environment.

Once entered, add them to the selection on the right side.

Direct to the General Tab and provide the same value for friendly name. Friendly name is the name that you will use to recognize this Certificate at later time when you are pointing this Certificate from other applications. Description could be any.
Hit apply to complete.

Then the exclamation message will be gone as you have successfully completed the Indexing of Information of the Certificate. Simply check the Web Server check box and hit enroll to obtain the Certificate.


Give it a few seconds and if everything good, the certificate will be successfully enrolled. If you are getting an error here saying that “Server or Service Unavailable”, you might need to restart the Certificate Server Service at your AD Server.

We can now see the Certificate at the Certificate Store:

Repeat the same for secondary OWA (OWA2) Server as well and then it completes our SSL Certificate Configuration Part.
4.5. Installing Office Web Apps Server 2013
Here comes the real thing. As we have completed almost all the prerequisites and background preparations for OWA Farm, we can proceed to the installation and Farm Deployment.
Log in to the OWA Servers using the domain Account (Northwind\sp_farm_svc) you have created. In this case it’s going to be the SharePoint Farm Account which will be used to Install OWA.
Map the Office Web Apps Server 2013 ISO (With Service pack 1) and run it.

As always, you have agree to the license terms and continue to proceed then.
The success message will be appeared in just few minutes if everything went well.
Now the most important steps – configuring the OWA farm done through PowerShell. The best tool for this is PowerShell ISE. From the OWA1, right click on PowerShell Icon and run ISE as Administrator:

To Create the New OWA Farm. Run the Following Script. If you are using SSL Offloading the Parameters will be bit different:
New-OfficeWebAppsFarm -Verbose -InternalUrl https://OfficeApps.Northwind.int -CertificateName OfficeApps.Northwind.Int -ClipartEnabled -TranslationEnable -EditingEnabled

-Verbose (This Switch is to display the status)
-InternalUrl (This is the Internal Url referred from SharePoint Later)
-EditingEnabled (This will allow your users to Edit Documents in Browser itself)
-CertificateName (You can Define your SSL Cert using this Parameter. Or you can do it yourself manually via IIS Later)
-ExternalUrl (Can be Defined in addition to InternalUrl Swith if you are setting up an External Scenario)
If all went well, you will see the result as above. And under the machines it will show the OWA1 which is our Primary OWA Server in this farm.

Check the IIS to verify the Web Applications Creation and SSL Certificate Assignment
Open IIS manage and check if these two web applications are created:

Note the Certificate Binding under the Site Bindings on the Right Panel and the Protocol is HTTPS.

4.6. Joining Secondary OWA machine to the Farm
Next step is to join our second machine to the OWA Farm. Login to the OWA2 Machine using the same domain credentials you used to Setup OWA1.
Open the PowerShell ISE as Administrator and run the following from OWA2:
New-OfficeWebAppsMachine -MachineToJoin OWA1
-MachineToJoin (This switch is to Define your Primary OWA Server Name). basically this is the Master Machine.

That’s all from the OWA Farm Side. Next step is to Integrate OWA Farm to SharePoint but before that Let’s test our setup.
4.7. Testing the OWA farm
Simply try the Hosting Discovery URL from a Different Server (SharePoint Server Will do) https://officeapps.northwind.int/hosting/discovery
If you are Retrieving this XML Page as below with the parameters, it means you are all good to go.

Discovery URL working means that your OWA Farm is accessible and functioning well. So the next step is to integrate OWA for SharePoint. Sometimes the hosting URL may not work within the OWA Servers itself due to the loopback checking, best thing is you can check it outside the OWA Servers.
The URL will not show any Warnings about the Certificate or Trust because it is valid internally within our Northind.Int Domain Environment. It will not be valid for Outside access unless it’s a valid External Certificate from a vendor.

4.8. Integrate Office Web Apps with SharePoint 2013
SharePoint Environment is already done with a host named site collection which is also using HTTPS. This scenario is fully setup for HTTPS in order to test the production level functionality. If you are using HTTPS for OWA your SharePoint Site must use HTTPS too, otherwise there is no point of using HTTPS on OWA.
Note: Recommended way to Deploy OWA is using HTTPS with a Valid SSL Certificate. HTTP is not recommended and it meant only for testing and Developmental Environments only.
In this scenario, we are using https://intranet.Northwind.Int host header site collection for integration testing. Below is the default SharePoint site which has some sample documents uploaded and it’s all good to go in SharePoint Side.
This SharePoint Farm also has two WFE Servers with NLB configured and this URL is fully load balanced with NLB.

Login to the SharePoint APP Server and Run the Following in SharePoint Shell or PowerShell ISE.
From SharePoint Shell
New-SPWOPIBinding -Server OFFICEAPPS.NORTHWIND.INT
From PowerShell ISE
Add-PSSnapin Microsoft.SharePoint.Powershell -EA 0
New-SPWOPIBinding -Server OFFICEAPPS.NORTHWIND.INT
- Server (This parameter to Define Your OWA Farm Name. Not the Name of any OWA Machines)

If all went well, you will see the above result. With defined inputs such as Zone, Server Name etc.
That’s all from the SharePoint Farm side.
Let’s test out the functionalities from SharePoint side now.
Note: Do not use Farm Account to test OWA. You must use a different user account to test this as SharePoint Farm account is not allowed to open documents from browser for security reasons.
Preview of a Document in Browser in WOPI Frame

Opening a Document

Editing a Document in Browser.

4.9. Glossary
Server Did Not Respond – Error when Adding WOPI Zone in SharePoint – If you already have some other WOPI Zones this could happen, Or else due to an Invalid Certificate on OWA Server.
Hosting/discovery Doesn’t Load – Mostly this happens if you try to open it from the OWA server itself. Try from another server. Also try to add the secondary Server and then load the URL.
Issue the Certificate for the Relevant Name – IF OWA1 (OWA1) or if OfficeApps.Northwind.int: Cert has to be for the same Name if it’s a SAN Cert.
To Test the availability across the Nodes, Shutdown one of the OWA Server and Check the Functionality. If you have completed above steps properly, OWA should work with the remaining node without any issue.
For more entries like this, visit: https://manojviduranga.wordpress.com